Table of Contents
- What Is a Construction Defect and Why Documentation Matters
- Identifying Latent vs Patent Defects Before You Document
- What You’ll Need to Document Construction Defects Effectively
- Step-by-Step Process to Document Construction Defects on Site
- Creating a Construction Defect Report Template for Consistency
- Legal Requirements for Construction Documentation and Compliance
- Best Construction Defect Tracking Software and Digital Workflows
- Common Mistakes to Avoid When Documenting Site Defects
Last Updated: August 13, 2026
What Is a Construction Defect and Why Documentation Matters
A construction defect is any deviation from project specifications, contractual obligations, or applicable building codes that compromises quality, safety, or functionality. Defects range from minor cosmetic issues to structural failures threatening occupant safety.
Documentation is foundational. Capturing defects in real time with visual evidence, timestamps, and location data creates an audit trail protecting all parties. A timestamped, geotagged image with typed or voice-recorded notes becomes admissible evidence. A photo without context, date, or location is nearly worthless in legal proceedings.
Capture defects during active construction, not after handover. Latent defects (hidden issues that emerge later) are exponentially harder to prove originated during construction if you lack contemporaneous documentation showing work conditions at the time.
Identifying Latent vs Patent Defects Before You Document
Understanding the difference between patent defects and latent defects changes your documentation strategy.
Patent defects are visible and apparent at inspection or handover, cracked concrete, misaligned drywall, missing caulk, or exposed wiring. These require immediate documentation for punch list items and contractual remediation obligations.
Latent defects are hidden or not immediately apparent, emerging months or years later, foundation cracks from poor compaction, water infiltration behind walls, or structural settling from inadequate design. The challenge is proving they originated during construction, not from post-completion maintenance failures or external factors.
For patent defects, photograph, timestamp, note the deficiency, and track remediation. For latent defects, document the construction process itself: workmanship, material quality, installation methods, batch numbers, and environmental conditions. If a defect emerges later, you have evidence of what was done and how.
Many inspectors skip documentation of “minor” patent defects, assuming they’ll be fixed during remediation. If the contractor disputes the defect classification or argues damage was pre-existing, you have no evidence. Document everything with the same rigor.
What You’ll Need to Document Construction Defects Effectively
Proper documentation requires three things: the right tools, standardized naming conventions, and a consistent workflow.
Mobile Tools and Equipment
Your primary documentation tool should be your smartphone with:
- GPS capability for automatic geotagging
- Reliable camera with at least 12MP resolution
- Offline functionality for areas with no cell service
- Voice recording for hands-free note-taking
- Battery life sufficient for a full site visit (8+ hours)
A dedicated field documentation app is essential. PhotoLog transforms your Android device into a professional field documentation tool with automatic GPS tagging, time-stamping, and instant searchability by event key or date.
Secondary tools include a measuring tape or laser measure for dimensional verification, a moisture meter for detecting water intrusion, and a flashlight for inspecting dark areas.
Documentation Standards and Naming Conventions
Establish a naming convention for sessions and defects before documenting.
Use a session key identifying the project, date, and inspector: ProjectName_20260813_Inspector. For individual defects, use location-based naming: Floor_Area_DefectType. Example: L2_NorthWall_CrackInConcrete.
Within your app, record the defect classification (patent or latent, structural or cosmetic), the specific non-compliance, location relative to fixed points, recommended remediation, and environmental context.
Standardized notes prevent ambiguity. "Vertical crack, approximately 3mm wide, extending 1.2 meters from floor, located on east wall of conference room, appears to follow mortar joint, may indicate settling or structural movement" is defensible. "Crack in wall" is vague.
Your naming convention and note structure should be consistent across all inspectors and projects. Consistency enables searchability and prevents duplicate or conflicting documentation of the same defect.
Step-by-Step Process to Document Construction Defects on Site
The workflow follows four core steps, each building on the previous one to create a complete record.
Step 1: Capture Visual Evidence with Geotagging and Timestamps
Open your documentation app, create a new session using your standardized session key, and enable GPS tagging. The app automatically records date, time, and GPS coordinates for every photo.
Position yourself to capture the defect clearly. Take multiple angles: a wide shot showing the defect in context, a medium shot showing the defect and surrounding area, and a close-up of the specific issue. The automatic timestamp and GPS coordinates are your legal foundation, proving when and where the defect was documented.
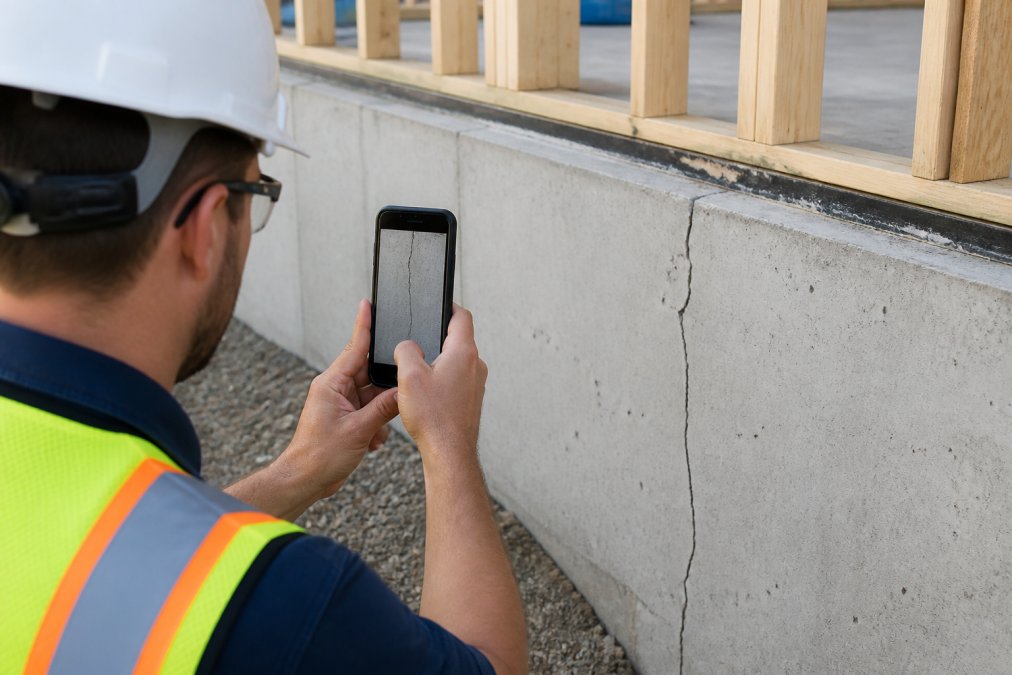
Do not skip geotagging. GPS coordinates are admissible evidence in disputes.
Step 2: Add Typed or Voice-Recorded Notes During Inspection
Immediately after capturing the photo, add notes while at the defect location. Be specific and factual, not interpretive.
Use voice recording if wearing gloves or if typing is awkward. If typing, keep notes concise but complete: the defect type, dimensions if measurable, location reference, severity assessment, likely cause if obvious, and any safety implications.
Example: "Vertical crack in concrete beam, approximately 2mm wide and 800mm long, located 1.5m from north column, extends through full depth of beam. Appears to follow construction joint. Possible cause: inadequate consolidation during pour. Recommend structural engineer review before remediation approval."
Step 3: Organize Defects by Session Key and Location
As you move through the site, your app organizes photos into your session. At the end of inspection, review captured photos. Ensure each has a timestamp, GPS coordinates, a typed or voice note, and a logical file name using your location-based naming convention.
Use metadata fields if available (defect type, severity, area, responsible party). Group photos of the same defect from multiple angles together so they appear as a single defect in your final report.
Step 4: Generate and Export Your Field Report
At the end of inspection, use the app’s report generation feature to create a formatted field report including project name and date, inspector name, summary of defects found, detailed defect list with photos, timestamps, GPS coordinates and notes, location map showing geotagged defects, and export options.
PhotoLog generates a formatted field report directly from session data, ready to share without additional formatting. Export as PDF for easy sharing and printing. For legal purposes, export as ZIP to preserve complete audit trail.
Creating a Construction Defect Report Template for Consistency
A standardized template ensures every inspection produces consistent, professional output.
Your template should include:
Header Information: Project name and address, inspection date and time, inspector name and contact, purpose of inspection.
Summary Section: Total defects documented, count by category (structural, safety-related, cosmetic, operational), count by severity (critical, major, minor), overall assessment.
Defect Details: For each defect, include defect ID, location (room, area, GPS coordinates), type and description, severity rating, photo(s) with timestamp and GPS data, inspector notes, recommended remediation, responsible party, target completion date, and status.
Closure Section: Inspector certification, date report generated, distribution list.
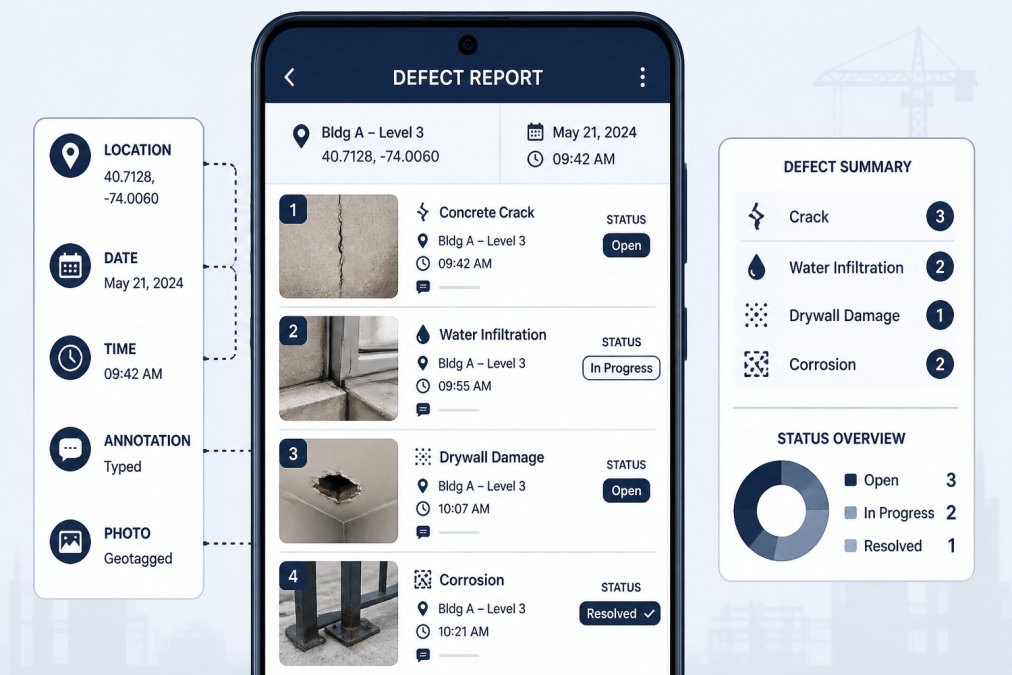
A professional template demonstrates competence, ensures no critical information is missed, creates a defensible record, and speeds up the inspection process.
Legal Requirements for Construction Documentation and Compliance
Documentation requirements vary by jurisdiction, project type, and contract terms.
Contractual Obligations: Your contract likely specifies documentation requirements, including timeframes for reporting defects (often 24-48 hours), required photo and location information, defect categorization, and delivery timelines to contractors for remediation. Review your contract before inspections.
Building Code Compliance: Reference the specific code section violated if a defect represents non-compliance. For example, note the specific fire-rating requirement from the National Fire Code if a defect involves inadequate fire-rating.
Professional Standards: If you’re a professional inspector, your documentation must meet standards of practice for your profession. Many professional associations publish documentation guidelines.
Privacy and Data Protection: Ensure compliance with applicable privacy legislation. Collect and store personal information only for legitimate business purposes and protect it from unauthorized access.
Workplace Safety: Report safety hazards to the site supervisor or safety officer immediately, not just document them. Document the hazard, report it verbally, and follow up with written documentation.
If documentation will be used in legal proceedings, ensure it meets the rules of evidence for your jurisdiction. Consult with legal counsel before relying on documentation in a dispute. The strongest documentation is created routinely and consistently, not specifically to support a legal argument.
Best Construction Defect Tracking Software and Digital Workflows
Effective defect tracking requires more than a camera. You need a system that captures data on site, organizes it during the project, and produces reports for stakeholders.
The most effective systems combine mobile capture with cloud-based organization and reporting. Capture photos and notes on your smartphone during site visits, sync data to a cloud platform, organize defects by project and location, assign remediation tasks, track completion, and generate reports.
PhotoLog specializes in mobile capture with automatic geotagging, voice or typed annotations, instant searchability by event key or date, and exportable field reports. For teams needing offline access and mobile-first documentation, PhotoLog is built for field inspectors, home inspectors, and environmental consultants working on multiple sites.
Many teams use project management platforms (Asana, Monday.com, etc.) to track defects and assign remediation tasks. Capture defects in your field app, export the data, and import it into your project management system where you assign tasks, set deadlines, and track completion.
In-progress documentation captures defects during active construction so contractors can remediate before handover. Post-completion documentation is a final inspection after substantial completion, identifying defects that must be addressed before client possession. Your documentation tool should support both workflows.
Common Mistakes to Avoid When Documenting Site Defects
Most documentation failures fall into predictable categories.
Mistake 1: Documenting Without Context, A photo of a crack without context is useless. Include a wide shot showing the defect in context, a medium shot showing the defect and surrounding area, and a close-up of the specific issue.
Mistake 2: Skipping Timestamp and Location Data, Without timestamps and GPS coordinates, your documentation has no legal foundation. A timestamped, geotagged photo with location notes is evidence.
Mistake 3: Using Inconsistent Naming and Organization, Establish standardized naming and ensure all inspectors follow it. Use your app’s built-in organization features rather than manual file organization.
Mistake 4: Documenting Defects After the Fact, The strongest documentation is contemporaneous, captured at the time and place of the defect.
Mistake 5: Failing to Distinguish Patent from Latent Defects, Adjust your documentation detail based on defect type. Patent defects need clear photos and notes. Latent defects need contextual documentation of the construction process and materials.
Mistake 6: Not Exporting or Backing Up Documentation, Export field reports regularly. Store backups in cloud storage or on a secure server.
Mistake 7: Creating Documentation Designed for Legal Disputes Rather Than Project Management, Document facts, not interpretations. Let the facts speak for themselves.
Professional documentation of construction site defects is a skill that improves with practice and process discipline. A smartphone with a proper documentation app beats pen and paper. The real difference comes from consistency: the same naming conventions, the same level of detail, the same standards applied across all inspectors and projects. When you standardize your process, documentation becomes faster, more reliable, and more defensible.
Frequently Asked Questions
What is the difference between a patent and latent defect in construction?
A patent defect is visible and obvious during inspection or handover, cracks in concrete, misaligned doors, or poor workmanship you can see immediately. A latent defect is hidden and only becomes apparent over time, such as water intrusion behind walls or structural issues that emerge months after practical completion. Both require documentation, but latent defects demand detailed timestamped records because they may not surface until after the warranty period. Documenting when you first notice symptoms, combined with geotagged photos and notes, creates an audit trail that proves timely discovery for dispute resolution.
What evidence is required to prove a construction defect?
Defensible evidence includes timestamped photographs, geotagged location data, written or voice-recorded notes describing the defect, references to project specifications and technical drawings, and records of when the defect was first observed. Your documentation should clearly show the deficiency, its location on site, measurements where relevant, and any deviation from contractual obligations or quality assurance standards. A formatted field report that ties all this together, photos, timestamps, GPS coordinates, and annotations, creates a complete audit trail that holds up in dispute resolution and demonstrates your diligence in identifying non-compliance.
How long should you keep construction defect records for warranty purposes?
Retention periods depend on your provincial regulations and the warranty terms specified in your contract. Generally, keep defect documentation for at least the duration of any applicable warranty period, plus several years beyond practical completion. Some defects may not surface until years after handover, so maintaining searchable, organized records with clear timestamps and geotagging ensures you can quickly locate evidence if a claim arises. Digital tools that automatically organize records by date and location make long-term retrieval manageable without cluttering physical storage.
How do you write a professional construction defect report?
A professional report combines clear visual evidence, precise location data, and detailed descriptions. Start with geotagged photos showing the defect from multiple angles. Add timestamped notes that describe what you observed, reference the relevant project specifications or contractual obligations, and note any measurements or safety concerns. Organize findings by location or defect type for easy review. Use consistent naming conventions and session keys so reports are searchable and comparable across multiple site visits. Automated field reporting tools that format photos, GPS data, timestamps, and annotations into a single exportable document save time and ensure consistency across your team.
This article was written using GrandRanker